

How to Propagate & Divide Daylilies
Daylily Seeds ~ Growing Daylilies from Seed
Growing daylilies from seeds is inexpensive and it can be very rewarding to see your plants grow as you nurture them from a small seed to a beautiful, flowering plant. Daylilies can be grown fairly easily from seed, however, since the seed is a cross between plants, it may not necessarily look like the parent plant. In fact, it could look quite different! That's part of the fun of growing daylilies from seed though - each plant created is unique and creating new daylily hybrids can be very exciting.
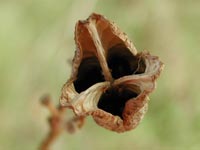
Daylily Seeds in a Mature Daylily Seed Pod
Once the daylily flower has been pollinated, a small green seed pod will appear at the base of where the flower once was. The seed pod will slowly grow and mature - usually in about 6-8 weeks. Mature seed pods turn brown and will split open to reveal black glossy seeds. Collect the seeds and store them in a cool, dry place.
Most daylily seeds will benefit from a period of chilling and you will often get better germination results when the seeds are chilled and pre-soaked. Simply put the seeds in a plastic ziploc-type bag along with a few teaspoons of water and some peat moss and refrigerate for at minimum of 3 weeks. Check the seeds frequently and plant any seeds that begin sprouting.
After chilling, daylily seeds can be treated much like other flower seeds. Plant the seeds in a soil-less mix and return them to temperatures of 70-75 degrees. Seedlings should appear in 2-6 weeks, however some may take as long as 3 months or more. Transplant the seedlings to the garden after the danger of frost has passed.
Keep in mind that it can take up to 3 years for a daylily grown from seed to bloom, so you'll need to be patient, but remember that it will be worth the wait!
Dividing Daylilies
Daylilies form thick, tuberous roots that grow rapidly into dense clumps. How quickly a daylily produces clumps depends on the cultivar and its' growing conditions. A daylily can produce as few as one fan division a year, or as many as fifteen or more per year. The amount a daylily increases in size will determine the frequency for which the clump should be divided or propagated. If clumps become very large and overcrowded, the number of blooms can decline, so it is important to divide your daylily clumps regularly enough to avoid overcrowding and to optimize the number of blooms.
Dividing daylilies is optimally done in the fall, but can also be done in early spring. The daylily clump should be dug from the ground and the soil shaken or washed off so that the division lines can be more easily seen. The foliage should be cut back to about 5 inches. Once the foliage has been cut back and the excess soil removed, you can assess the condition of the clump. If the clump is mature, the individual divisions may be pulled apart by hand. However, if the clump is solid, you may need to use a sharp knife to cut through the divisions.